Photography
Uyuni perspective photos: how to shoot them, props and ideas
· 6 min read
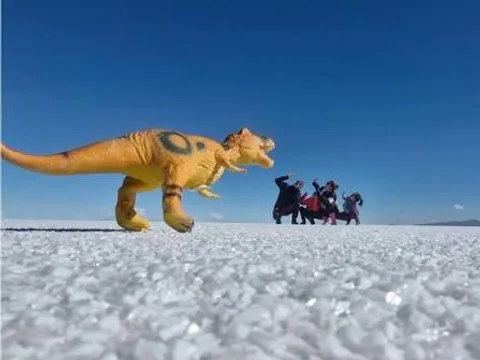
Perspective photos work on the Salar de Uyuni because the flat white crust hides every clue to distance. Put a phone almost on the ground, a small prop 20 to 50 cm from the lens and your people 10 to 30 metres behind, and keep both sharp. You need dry salt, so roughly May to November.
Why does the trick work so well in Uyuni?
Your brain judges distance from a handful of cues: things shrinking towards a horizon, texture getting finer, haze, shadows, the ground rising to meet the sky. The salar removes nearly all of them. Across more than 10,000 km² the surface varies in height by less than a metre, the crust looks the same at two metres as at two hundred, and at 3,656 m the air is dry and clear enough that distant things do not fade. A toy and a person end up side by side in the frame with nothing to tell you which is far away.
The hexagonal ridges of the dry season are the one cue left, which is why the best shots are taken from so low that the ridges blur into a single white band.
The set-up that works every time
- Get the camera down. Lie on the salt or rest the phone directly on it, lens a few centimetres above the surface. Most failed shots are taken from eye level.
- Prop close, people far. Something small 20 to 50 cm from the lens, your subjects 10 to 30 metres away. Further makes them smaller, and the shouting harder.
- Use the widest lens. On a phone, the 0.5x ultra-wide exaggerates the difference in size. Phones are often better at this than big cameras, because their small sensors keep near and far sharp at once.
- With a camera, close the aperture to f/11 or f/16, move the prop a little further out, around a metre, and check on the screen that both the prop and the people are sharp. If one of the two is soft, the illusion breaks.
- Direct with your hands. Only the photographer sees the frame. Agree on signals for left, right, closer and further before the group walks off.
- Shoot bursts. Jumping, leaning and pretending to be stepped on all look better on the fifth try than on the first.
Props that work, and ideas worth stealing
A good prop is small, solid, brightly coloured and able to stand up on its own on the salt. The ones that never fail:
- A toy dinosaur or monster chasing the group, or about to eat one of them.
- A crisp tube or a bottle that people climb out of, filmed as a short video by walking them out of it.
- A boot, a hat or a backpack that the whole group stands on or hides under.
- No prop at all: one person a metre from the lens “holding” a friend in the palm of a hand, or a giant about to step on everyone else.
Bring props from home or pick something up in town before you leave; there is nothing to buy out on the salar. Pack bright clothes as well. Against white salt and blue sky, red, yellow and orange read far better than black or white, which is why the what-to-bring list for our 1-day tour asks for a hat and colourful clothes for the photos.
When is the light best for perspective shots?
Midday is not the enemy here. Shadows are a distance cue, and a high sun keeps them short and directly under your subjects, which helps the illusion. Late morning to mid-afternoon on a dry, bright day is ideal. The low, golden light of the last hour is better spent on silhouettes and on the reflections described in our guide to the mirror effect.
On both of our tours the perspective stop happens in the middle of the salar on day one, and the 1-day tour adds a creative photo and video session before Incahuasi Island and the sunset. Ask your driver-guide for the set-ups they know.
Mirror season is a different kind of photo
From December to March, when water lies on the salar, perspective tricks get much harder: the reflection doubles the prop and gives its size away, and dry patches big enough to work on can be scarce. The water offers other pictures instead. Keep the lens low, a hand’s width above the surface, so the reflection fills half the frame; put people against the brightest part of the sky for silhouettes; and wait for still air, because the slightest ripple breaks the mirror. What else changes on the tour in those months is in our rainy season guide.
Can you fly a drone at the Uyuni salt flats?
Yes, within Bolivia’s rules, which changed recently. Since 1 September 2026 drones have been governed by a bulletin of the DGAC, Bolivia’s civil aviation authority (BR-108/2026). For a non-commercial flight in what it calls the open category, the main points are:
- Any drone of 200 g or more must be registered online with the DGAC before it flies, and carry an identification label. Below 200 g, no registration is required.
- A maximum height of 122 m (400 ft) above the ground, always within your line of sight and never more than 750 m away horizontally.
- Daylight and good visibility only, at least 30 m from anyone not involved in the flight, and never from a moving vehicle.
- Not within 9 km of an airport without prior DGAC authorisation. Uyuni’s airport sits just north-west of town, so the town and the train cemetery are inside that radius.
Anything commercial falls outside the open category and needs a DGAC operating authorisation. Protected areas such as Incahuasi Island and the Eduardo Avaroa reserve may add their own restrictions, so ask at the gate before you launch, and keep well away from flamingos: a drone over a colony puts the birds up. In practice, the cold drains batteries fast and brine spray is bad for motors, so take off and land from a bag rather than from wet crust.
Looking after your camera on the salt
- Salt dust and brine are corrosive. Keep cameras in a bag between shots and wipe everything with a dry cloth in the evening.
- Batteries lose charge quickly in the cold. Keep spares in an inside pocket and carry a power bank.
- Do not change lenses in the wind. Fine salt finds its way onto sensors and stays there.
- For low shots, rest the phone on a glove or a small bag rather than straight on the crust.
The rest of the kit list, from sunglasses to the warm layers you will want once the sun goes down, is in what to pack for a Uyuni tour. When you are ready, you can pick a date and book online.
Frequently asked questions
- What props should I bring for Uyuni perspective photos?
- Small, solid, colourful things that stand up on their own: a toy dinosaur, a crisp tube, a bottle, a boot or a hat. Bring them from home or buy them in Uyuni before the tour, because there is nowhere to buy anything on the salar.
- When can you take perspective photos at the Uyuni salt flats?
- When the crust is dry, roughly May to November. In the wet season, from December to March, standing water makes the trick much harder, but it brings the reflection photographs instead.
- Do I need a professional camera for the salt flats?
- No. A phone is often better, because its small sensor keeps the prop and the people sharp at the same time and the ultra-wide lens exaggerates the effect. What matters is getting the lens down to the level of the salt.
- Can I fly a drone at the Uyuni salt flats?
- Yes, within the DGAC rules in force since 1 September 2026: register any drone of 200 g or more, stay below 122 m and within sight, fly in daylight, keep 30 m from other people and stay clear of the area around Uyuni’s airport. Ask at protected areas before flying.
- What is the best time of day for perspective photos?
- Late morning to mid-afternoon, when the sun is high and shadows are short. Short shadows remove one of the last clues to distance. Keep sunset for silhouettes and, in the wet season, reflections.